
안녕하세요
이번 시간에는 크롤링을 하고 리사이클러뷰에 담아보는 것을 해보겠습니다.
이전 블로그 내용과 이어지는 내용입니다.
혹시 이전 블로그를 아직 보지 못하신 분들은 아래 링크를 클릭해 먼저 봐주세요
[안드로이드] #2 주식, 코인 평단가계산기 (주식, 코인 평단가 계산기 + 크롤링 + 바텀네비게이션
안녕하세요 이전 블로그 내용과 이어지는 내용입니다. 혹시 이전 블로그를 아직 보지 못하신 분들은 아래 링크를 클릭해 먼저 봐주세요 https://adc6981.tistory.com/8 [안드로이드] #1 바텀네비게이션뷰
adc6981.tistory.com
우선 화면 구성부터 해보겠습니다.
frag2.xml
<?xml version="1.0" encoding="utf-8"?>
<LinearLayout xmlns:android="http://schemas.android.com/apk/res/android"
    android:layout_width="match_parent"
    android:layout_height="match_parent"
    android:layout_margin="3dp"
    android:orientation="vertical">

    <LinearLayout
        android:layout_width="match_parent"
        android:layout_height="wrap_content"
        android:layout_marginBottom="5dp"
        android:orientation="horizontal">

        <LinearLayout
            android:layout_width="match_parent"
            android:layout_height="match_parent"
            android:layout_marginRight="1dp"
            android:layout_weight="1"
            android:background="@drawable/layout_background"
            android:orientation="vertical">

            <LinearLayout
                android:layout_width="match_parent"
                android:layout_height="wrap_content"
                android:layout_margin="2dp"
                android:orientation="horizontal">

                <TextView
                    android:id="@+id/textView2"
                    android:layout_width="match_parent"
                    android:layout_height="match_parent"
                    android:layout_weight="1.5"
                    android:text="코스피" />

                <TextView
                    android:id="@+id/kospi"
                    android:layout_width="match_parent"
                    android:layout_height="wrap_content"
                    android:layout_weight="1"
                    android:text="TextView" />
            </LinearLayout>

            <LinearLayout
                android:layout_width="match_parent"
                android:layout_height="match_parent"
                android:layout_margin="2dp"
                android:orientation="horizontal">
                <LinearLayout
                    android:layout_width="match_parent"
                    android:layout_height="wrap_content"
                    android:layout_weight="1.5">
                </LinearLayout>
                <LinearLayout
                    android:layout_width="match_parent"
                    android:layout_height="wrap_content"
                    android:layout_weight="1">
                    <TextView
                        android:id="@+id/kospi_updown1"
                        android:layout_width="match_parent"
                        android:layout_height="wrap_content"
                        android:layout_weight="1.5"
                        android:text="123" />

                    <TextView
                        android:id="@+id/kospi_updown2"
                        android:layout_width="match_parent"
                        android:layout_height="wrap_content"
                        android:layout_weight="1"
                        android:text="456" />
                </LinearLayout>
            </LinearLayout>
        </LinearLayout>

        <LinearLayout
            android:layout_width="match_parent"
            android:layout_height="match_parent"
            android:layout_marginLeft="1dp"
            android:layout_weight="1"
            android:background="@drawable/layout_background"
            android:orientation="vertical">

            <LinearLayout
                android:layout_width="match_parent"
                android:layout_height="wrap_content"
                android:layout_margin="2dp"
                android:orientation="horizontal">


                <TextView
                    android:id="@+id/textView3"
                    android:layout_width="match_parent"
                    android:layout_height="wrap_content"
                    android:layout_weight="1.5"
                    android:text="코스닥" />

                <TextView
                    android:id="@+id/kosdaq"
                    android:layout_width="match_parent"
                    android:layout_height="wrap_content"
                    android:layout_weight="1"
                    android:text="TextView" />
            </LinearLayout>

            <LinearLayout
                android:layout_width="match_parent"
                android:layout_height="match_parent"
                android:layout_margin="2dp"
                android:orientation="horizontal">
                <LinearLayout
                    android:layout_width="match_parent"
                    android:layout_height="wrap_content"
                    android:layout_weight="1.5">
                </LinearLayout>
                <LinearLayout
                    android:layout_width="match_parent"
                    android:layout_height="wrap_content"
                    android:layout_weight="1">
                    <TextView
                        android:id="@+id/kosdaq_updown1"
                        android:layout_width="match_parent"
                        android:layout_height="wrap_content"
                        android:layout_weight="1.5"
                        android:text="123" />

                    <TextView
                        android:id="@+id/kosdaq_updown2"
                        android:layout_width="match_parent"
                        android:layout_height="wrap_content"
                        android:layout_weight="1"
                        android:text="456" />
                </LinearLayout>
            </LinearLayout>
        </LinearLayout>
    </LinearLayout>

    <LinearLayout
        android:layout_width="match_parent"
        android:layout_height="match_parent"
        android:orientation="vertical">


        <TextView
            android:id="@+id/textView"
            android:layout_width="match_parent"
            android:layout_height="wrap_content"
            android:layout_marginTop="3dp"
            android:layout_marginBottom="3dp"
            android:gravity="center"
            android:text="금융 주요 뉴스"
            android:textSize="18sp" />

        <androidx.recyclerview.widget.RecyclerView
            android:id="@+id/rv"
            android:layout_width="match_parent"
            android:layout_height="wrap_content">


        </androidx.recyclerview.widget.RecyclerView>
    </LinearLayout>
</LinearLayout>
android:background="@drawable/layout_background"이 부분에서 오류가 나올 겁니다.
따로 뒷 배경을 디자인해서 적용시켜야 합니다.
res→drawable에 layout_background를 만들어 줍니다.
<?xml version="1.0" encoding="utf-8"?>
<shape
    xmlns:android="http://schemas.android.com/apk/res/android"
    android:shape="rectangle">
    <solid android:color="#EEEEEE" />
    <stroke android:color="#000000" android:width="1dp" />
    <corners android:radius="7dp" />
</shape>
이러면 코스피와 코스닥 지수를 크롤링한 부분의 뒷배경이 변경될 것입니다.
이후 리사이클러뷰에서 보일 화면을 구성해보겠습니다.
item_list.xml
<?xml version="1.0" encoding="utf-8"?>
<LinearLayout xmlns:android="http://schemas.android.com/apk/res/android"
    android:layout_width="match_parent"
    android:layout_height="wrap_content"
    android:orientation="vertical">

    <LinearLayout
        android:layout_width="match_parent"
        android:layout_height="wrap_content"
        android:orientation="vertical">
        <TextView
            android:id="@+id/text_news"
            android:layout_width="match_parent"
            android:layout_height="wrap_content"
            android:textSize="25sp"
            android:text="test">
        </TextView>
    </LinearLayout>
    <LinearLayout
        android:layout_width="match_parent"
        android:layout_height="wrap_content"
        android:layout_marginTop="3dp"
        android:layout_marginBottom="3dp">

        <View
            android:layout_width="match_parent"
            android:layout_height="1dp"
            android:background="#000000" />

    </LinearLayout>
</LinearLayout>
화면 구성을 끝났습니다.
이후 자바 코드를 작성해 봅시다.
크롤링은 네이버금융에서 주요뉴스와 한국거래소에서 코스피와 코스닥 지수를 가져올 것입니다.
네이버 금융
국내 해외 증시 지수, 시장지표, 뉴스, 증권사 리서치 등 제공
finance.naver.com
http://www.krx.co.kr/main/main.jsp
한국거래소
www.krx.co.kr
네이버금융에서 크롤링한 데이터를 받아올 객체를 만들어 줍니다.
뉴스 제목과 url 정보를 가져올 것입니다.
Data.java
package com.psw.stocktest;

public class Data {
    private String str_news;
    private String news_link;

    public Data() {

    }

    public String getNews_link() {
        return news_link;
    }

    public void setNews_link(String news_link) {
        this.news_link = news_link;
    }

    public String getStr_news() {
        return str_news;
    }

    public void setStr_news(String str_news) {
        this.str_news = str_news;
    }
}
네이버금융에서 가져온 데이터 들은 리사이클러뷰를 이용해 보여줄 것입니다.
리사이클러뷰 사용 방법입니다.
MainAdapter.java
public class MainAdapter extends RecyclerView.Adapter<MainAdapter.ViewHolder> {

    private ArrayList<Data> arrayList;
    private Context context;

    public MainAdapter(Context context, ArrayList<Data> arrayList) {
        this.arrayList = arrayList;
        this.context = context;
        notifyDataSetChanged();
    }

    @NonNull
    @Override
    public MainAdapter.ViewHolder onCreateViewHolder(@NonNull ViewGroup parent, int viewType) {
        View view = LayoutInflater.from(parent.getContext()).inflate(R.layout.item_list,parent,false);
        ViewHolder holder = new ViewHolder(view);

        return holder;
    }

    @Override
    public void onBindViewHolder(@NonNull MainAdapter.ViewHolder holder, @SuppressLint("RecyclerView") int position) {
        holder.text_news.setText(arrayList.get(position).getStr_news());
        holder.itemView.setTag(position);
        holder.itemView.setOnClickListener(new View.OnClickListener() {
            @Override
            public void onClick(View view) {
                String str = arrayList.get(position).getNews_link();
                Intent intent =new Intent(Intent.ACTION_VIEW, Uri.parse(str));
                context.startActivity(intent);
            }
        });

    }

    @Override
    public int getItemCount() {
        return arrayList.size();
    }

    public class ViewHolder extends RecyclerView.ViewHolder {
        protected TextView text_news;
        public ViewHolder(@NonNull View itemView) {
            super(itemView);
            this.text_news = itemView.findViewById(R.id.text_news);
        }
    }
}
어댑터를 만들었다면 이것을 frag2에서 실행해 줄 것입니다.
frag2.java에서 리사이클러뷰에 필요한 객체들을 선언해 줍니다.
private ArrayList<Data> arrayList;
private MainAdapter mainAdapter;
private RecyclerView rv;
private LinearLayoutManager linearLayoutManager;
이후 리사이클러뷰(rv)에 mainAdapter를 담아주면 리사이클러뷰가 정상 작동할 것입니다.
rv= view.findViewById(R.id.rv);
linearLayoutManager = new LinearLayoutManager(getContext(),LinearLayoutManager.VERTICAL,true);
linearLayoutManager.setStackFromEnd(true);
rv.setLayoutManager(linearLayoutManager);

arrayList = new ArrayList<>();
mainAdapter = new MainAdapter(getActivity(),arrayList);
rv.setAdapter(mainAdapter);
이제 본격적으로 크롤링을 해봅시다.
안드로이드 매니패스트에 인터넷 권한을 설정해줍니다.
<uses-permission android:name="android.permission.INTERNET" />
<uses-permission android:name="android.permission.ACCESS_NETWORK_STATE"/>
먼저 한국거래소에서 코스피와 코스닥 지수를 가져오겠습니다.
크롤링은 무조건 스레드에서 실행되어야 합니다. 그리고 Handler를 이용해 화면을 업데이트할 수 있습니다.
간단하게 하면 3줄로 크롤링을 할 수 있습니다.
아래 내용 다음과 같습니다.
한국거래소에서 index-price이라는 것을 가져오는 것입니다.
document = Jsoup.connect("http://www.krx.co.kr/main/main.jsp").get();
Elements contents_price = document1.getElementsByClass("index-price");
price = contents_price.text();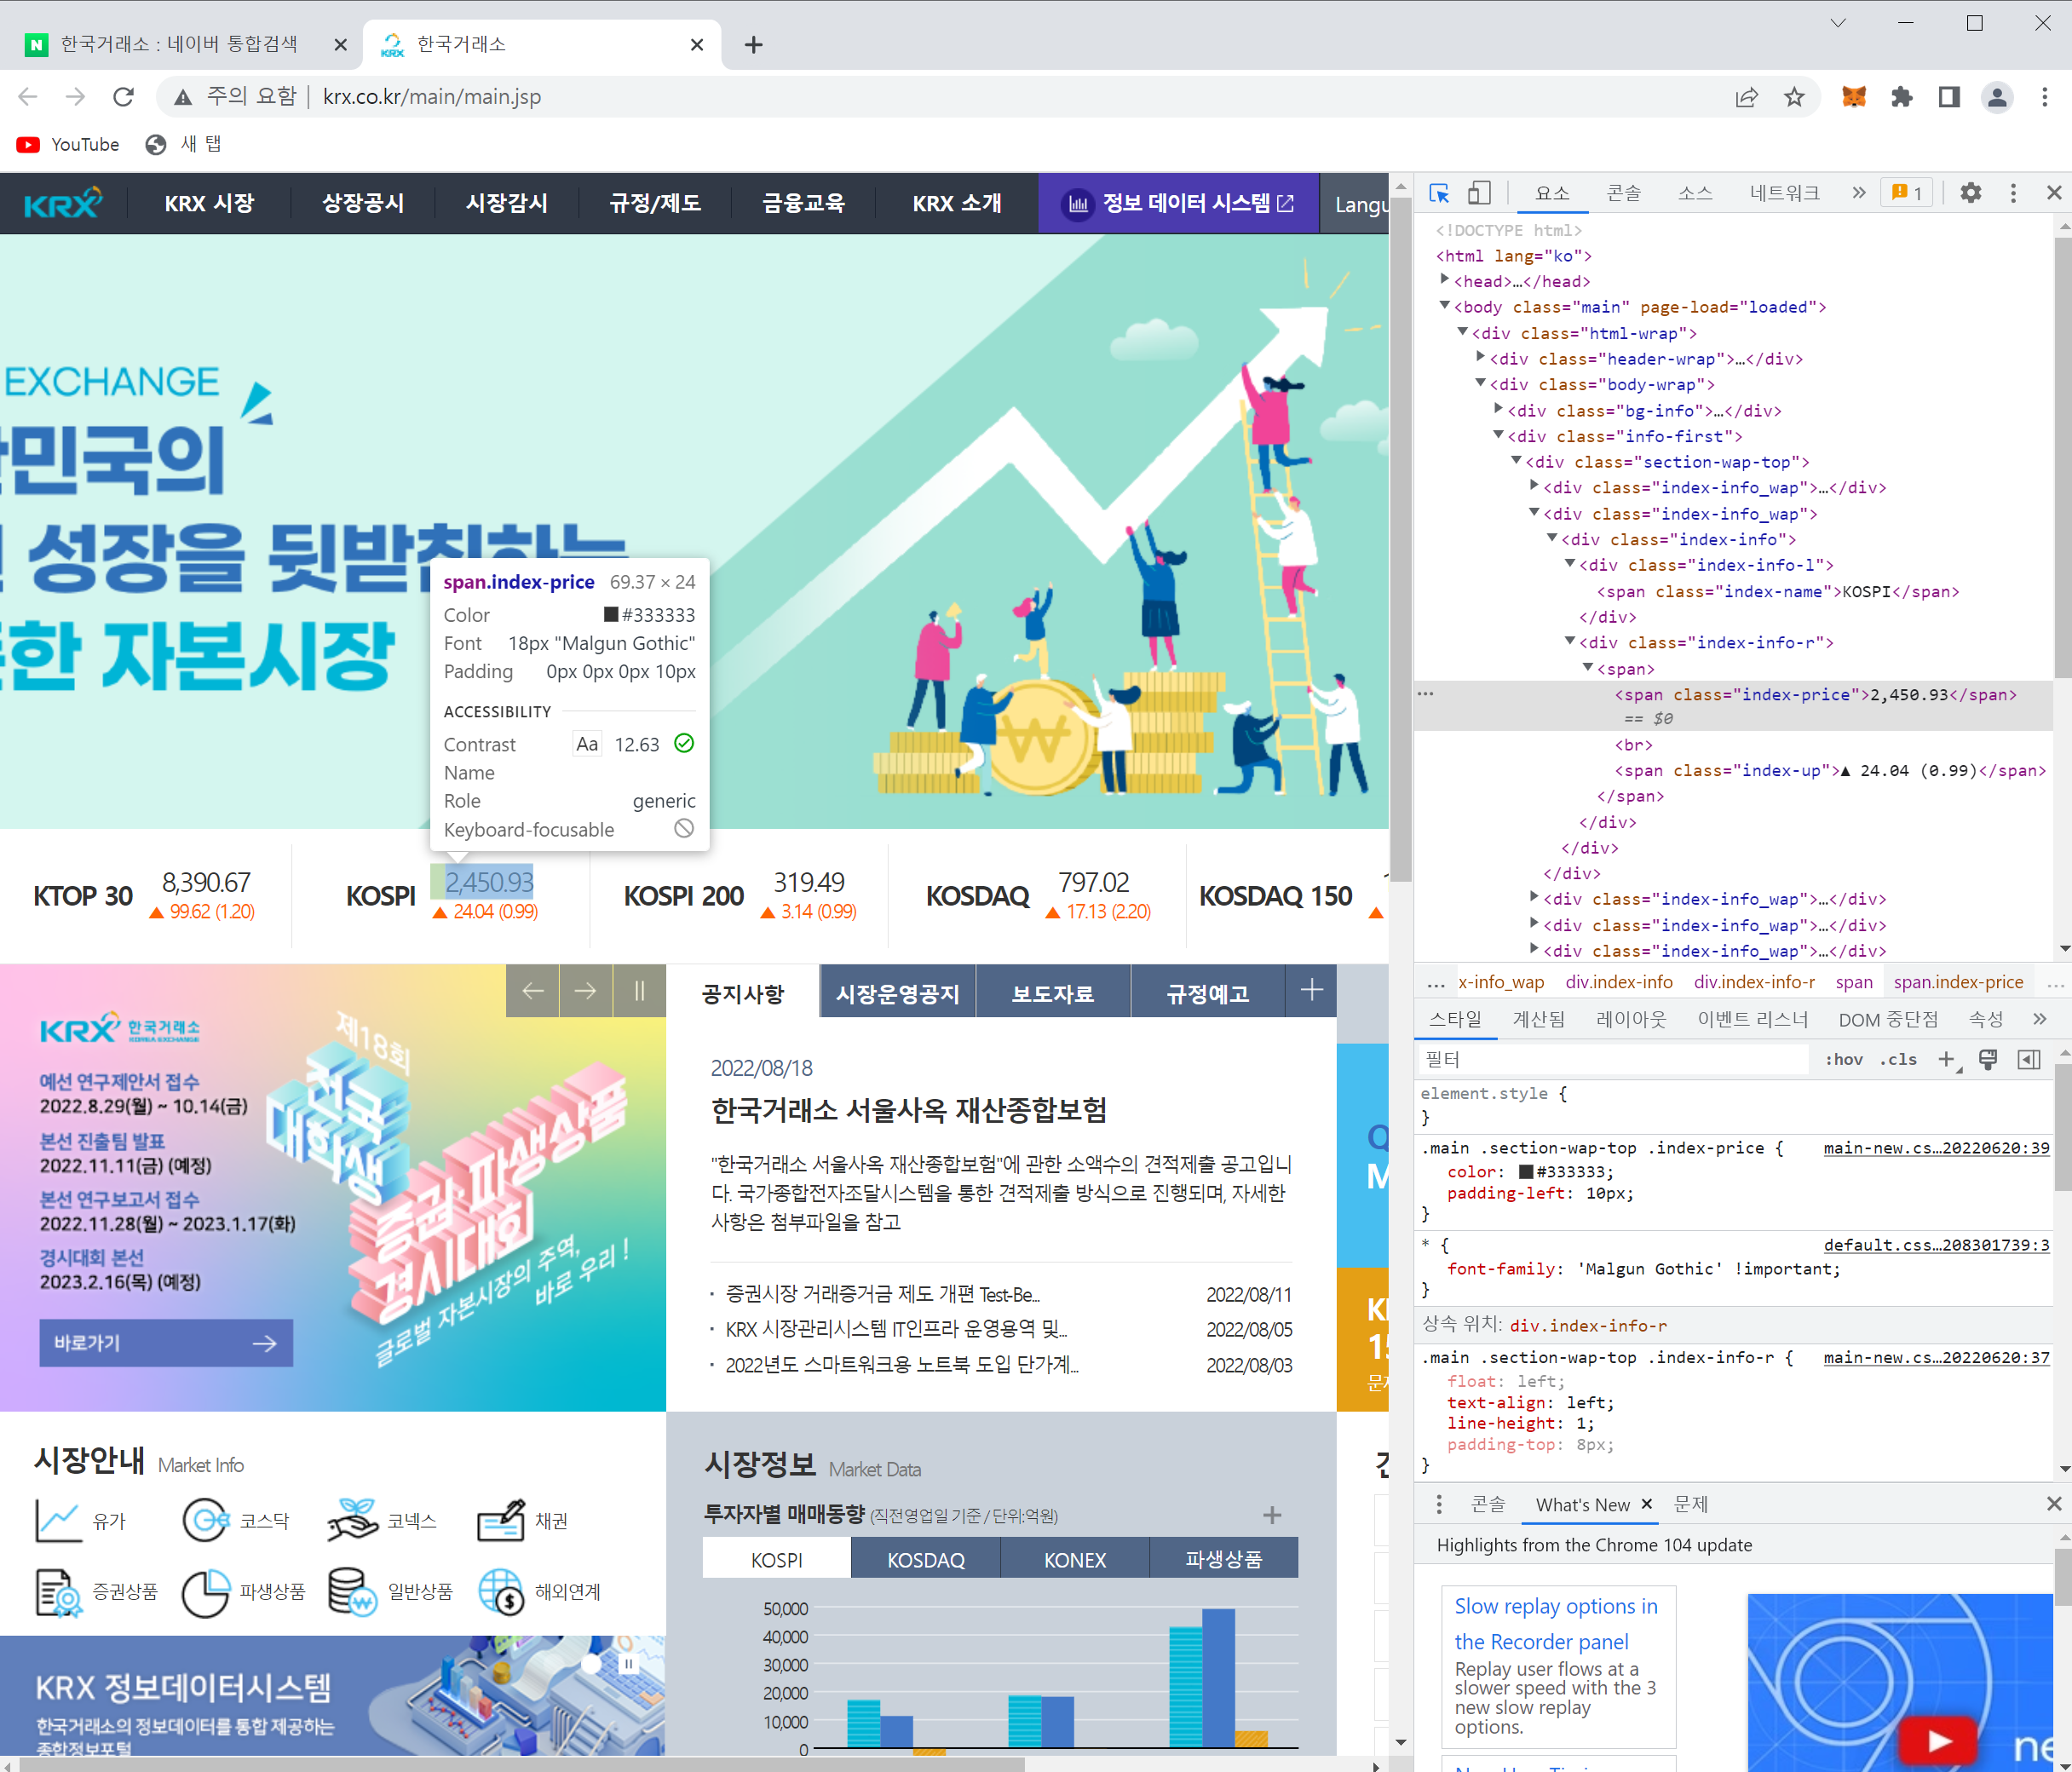
코스피의 가격을 가져오는 방법입니다.
log를 찍으면 다음과 같습니다.
8,390.67 2,450.93 319.49 797.02 1,139.00 1,452.40
KTOP30지수, KOSPI지수 등 모든 가격이 나오게 됩니다. KTOP30, KOSPI등 모두의 class이름이 index-price이기 때문입니다.
여기서 제가 필요한 데이터는 KOSPI지수, KOSDAQ지수입니다.
자세히 보면 데이터들이 빈칸을 기준으로 나눠져 있습니다.
String[] sp_price = price.split(" ");그래서 price를 빈칸으로 나눈 후 제가 원하는 데이터만 가져다 사용하겠습니다.
sp_price[1], sp_price[3]이 코스피와 코스닥 지수입니다.
같은 방법으로 코스피 코스닥 지수를 가져와 보겠습니다.
document1 = Jsoup.connect("http://www.krx.co.kr/main/main.jsp").get();
Elements contents_price = document1.getElementsByClass("index-price");
price =contents_price.text();
try{
                        Elements contents_up_down = document1.getElementsByClass("index-up");
                        up_down = contents_up_down.text();
                        String[] sp_up_down = up_down.split(" ");
                        if(sp_up_down[3].equals("▲")){

                        }
                    }catch (ArrayIndexOutOfBoundsException e){
                        Elements contents_up_down = document1.getElementsByClass("index-down");
                        up_down = contents_up_down.text();
                    }
원래는 up_down값을 아래와 같이 가져왔으나 오류가 있어서 변경합니다.
Elements contents_up_down = document1.getElementsByClass("index-up");
up_down = contents_up_down.text();
코스피가 상승 할때면 class이름이 index-up으로 표현되고 하락할 때면 index-down으로 표시됩니다.
그래서 하락할때 index-up을 해서 값을 가져오면 String[] sp_up_down에서 인덱스 오류가 나올 겁니다.
이것을 방지하기 위해 try catch 문을 추가했습니다.
	String[] sp_price = price.split(" ");
               String[] sp_up_down = up_down.split(" ");
                    if(sp_up_down[3].equals("▲")){
                        kospi.setTextColor(Color.parseColor("#FF0000"));
                        kospi_updown1.setTextColor(Color.parseColor("#FF0000"));
                        kospi_updown2.setTextColor(Color.parseColor("#FF0000"));
                    }else if(sp_up_down[3].equals("▼")) {
                        kospi.setTextColor(Color.parseColor("##0027FF"));
                        kospi_updown1.setTextColor(Color.parseColor("##0027FF"));
                        kospi_updown2.setTextColor(Color.parseColor("##0027FF"));
                    }else{

                    }
                    if(sp_up_down[9].equals("▲")){
                        kosdaq.setTextColor(Color.parseColor("#FF0000"));
                        kosdaq_updown1.setTextColor(Color.parseColor("#FF0000"));
                        kosdaq_updown2.setTextColor(Color.parseColor("#FF0000"));
                    }else if(sp_up_down[9].equals("▼")) {
                        kosdaq.setTextColor(Color.parseColor("##0027FF"));
                        kosdaq_updown1.setTextColor(Color.parseColor("##0027FF"));
                        kosdaq_updown2.setTextColor(Color.parseColor("##0027FF"));
                    }else{

                    }
지수가 상승일 경우 텍스트 색을 빨간색으로 변경했고 하락일 경우 파란색으로 변경했습니다.
bundle.putString("kospi",sp_price[1]);
bundle.putString("kosdaq",sp_price[3]);
bundle.putString("kospi_u_d1",sp_up_down[4]);
bundle.putString("kospi_u_d2",sp_up_down[5]);
bundle.putString("kosdaq_u_d1",sp_up_down[10]);
bundle.putString("kosdaq_u_d2",sp_up_down[11]);
bundel을 이용해 데이터를 보내줍니다.
Handler handler = new Handler(){
        @Override
        public void handleMessage(@NonNull Message msg) {
            if(dialog!=null){
                dialog.dismiss();
            }
            Bundle bundle = msg.getData();
            kospi.setText(bundle.getString("kospi"));
            kosdaq.setText(bundle.getString("kosdaq"));
            kospi_updown1.setText(bundle.getString("kospi_u_d1"));
            kospi_updown2.setText(bundle.getString("kospi_u_d2"));
            kosdaq_updown1.setText(bundle.getString("kosdaq_u_d1"));
            kosdaq_updown2.setText(bundle.getString("kosdaq_u_d2"));

            mainAdapter.notifyDataSetChanged();

        }
    };
이후 Handler에서 bundle을 이용해 데이터를 받아줍니다.
여기까지가 코스피와 코스닥의 지수를 가져오는 방법입니다.
네이버금융 주요뉴스도 비슷한 방법으로 크롤링할 것입니다.
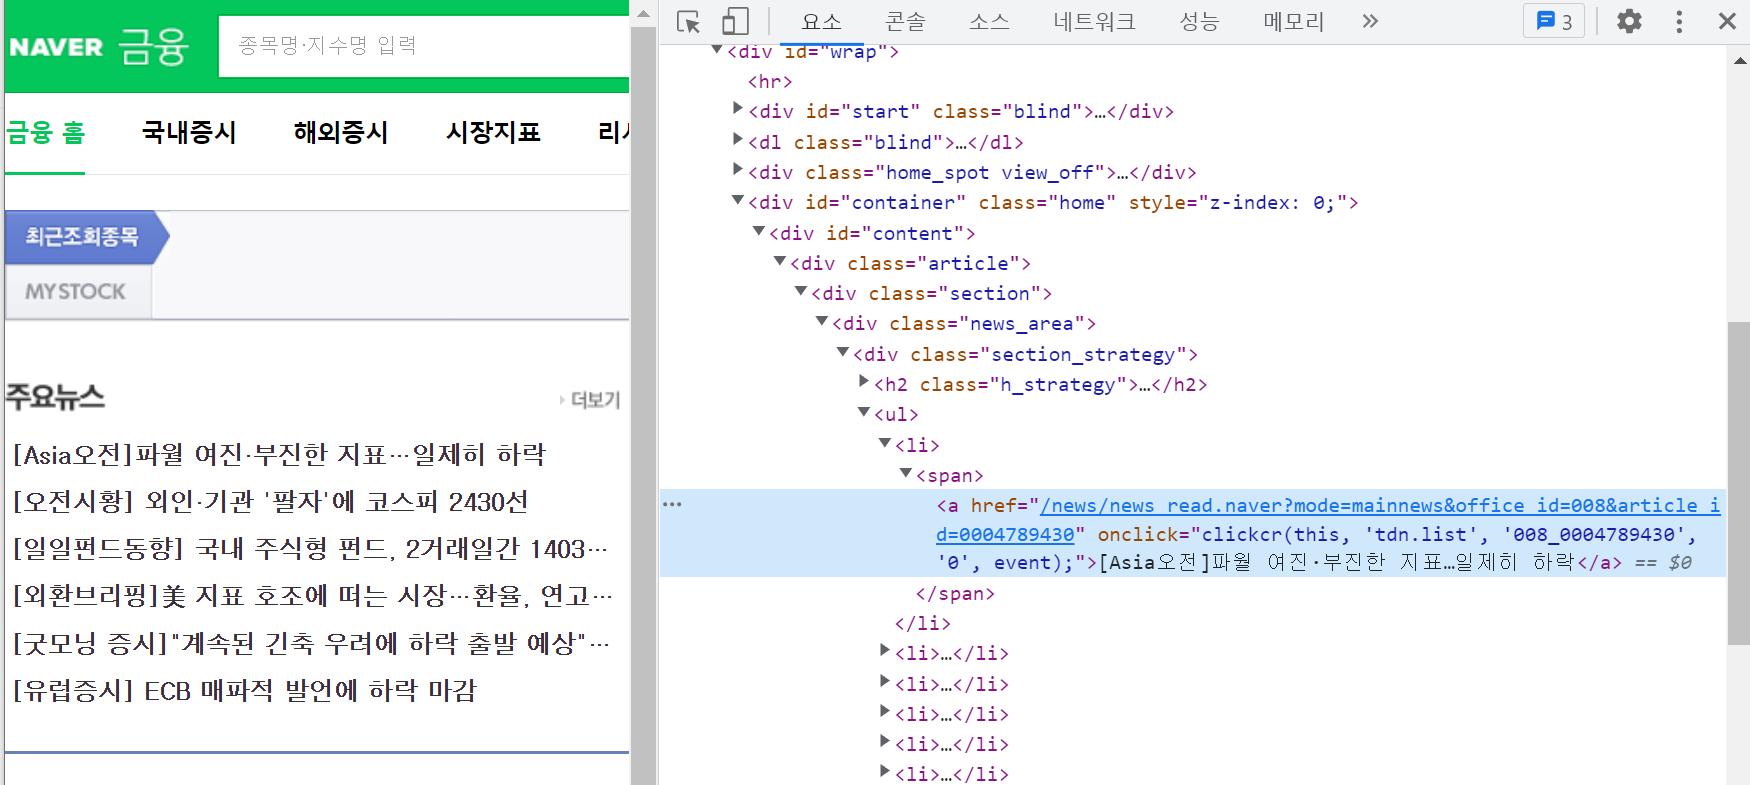
주요뉴스의 6개의 제목과 주소를 크롤링할 것입니다.
첫 번째 뉴스 요소를 누르면 다음 위와 같은 사진처럼 나올 겁니다. 여기서 마우스 우클릭 → 복사 → JS경로복사를 하시면
다음과 같은 내용이 복사될 것입니다.
#content > div.article > div.section > div.news_area > div > ul > li:nth-child(1) > span > a"
다음 뉴스는 child(2)를 하면 가져올 수 있겠군요
document2 = Jsoup.connect("https://finance.naver.com").get();
                    String str1 = "#content > div.article > div.section > div.news_area > div > ul > li:nth-child(";
                    String str2 = ") > span > a";
                    for (int i = 1; i <7; i++) {
                        String str3 = String.valueOf(i);
                        String final_str = str1+str3+str2;
                        Elements elements = document2.select(final_str);
                        String abs = elements.attr("abs:href");
                        Data data = new Data();
                        data.setStr_news(elements.text());
                        data.setNews_link(abs);
                        arrayList.add(data);
                    }
                    Collections.reverse(arrayList);
크롤링한 데이터를 가져와서 Data 객체에 담아줍니다.
holder.itemView.setOnClickListener(new View.OnClickListener() {
            @Override
            public void onClick(View view) {
                String str = arrayList.get(position).getNews_link();
                Intent intent =new Intent(Intent.ACTION_VIEW, Uri.parse(str));
                context.startActivity(intent);
            }
        });
리사이클러뷰를 클릭하면 그에 해당하는 position값의 getNews_link()를 실행하게 됩니다.
Frag2.java 전체 코드
public class Frag2 extends Fragment {
    private View view;
    private String price;
    private String up_down;

    private TextView kospi,kosdaq,kospi_updown1,kospi_updown2,kosdaq_updown1,kosdaq_updown2;

    private ArrayList<Data> arrayList;
    private MainAdapter mainAdapter;
    private RecyclerView rv;
    private LinearLayoutManager linearLayoutManager;


    @Nullable
    @Override
    public View onCreateView(@NonNull LayoutInflater inflater, @Nullable ViewGroup container, @Nullable Bundle savedInstanceState) {
        view = inflater.inflate(R.layout.frag2,container,false);

        kospi = view.findViewById(R.id.kospi);
        kosdaq = view.findViewById(R.id.kosdaq);
        kospi_updown1 = view.findViewById(R.id.kospi_updown1);
        kospi_updown2 = view.findViewById(R.id.kospi_updown2);
        kosdaq_updown1 = view.findViewById(R.id.kosdaq_updown1);
        kosdaq_updown2 = view.findViewById(R.id.kosdaq_updown2);

        rv= view.findViewById(R.id.rv);
        linearLayoutManager = new LinearLayoutManager(getContext(),LinearLayoutManager.VERTICAL,true);
        linearLayoutManager.setStackFromEnd(true);
        rv.setLayoutManager(linearLayoutManager);
        arrayList = new ArrayList<>();
        mainAdapter = new MainAdapter(getActivity(),arrayList);
        rv.setAdapter(mainAdapter);


        final Bundle bundle = new Bundle();
        new Thread(){
            @Override
            public void run() {
                Document document1;
                Document document2;
                try {
                    //코스피,코스닥 지수
                    document1 = Jsoup.connect("http://www.krx.co.kr/main/main.jsp").get();
                    Elements contents_price = document1.getElementsByClass("index-price");
                    price =contents_price.text();
                    try{
                        Elements contents_up_down = document1.getElementsByClass("index-up");
                        up_down = contents_up_down.text();
                        String[] sp_up_down = up_down.split(" ");
                        if(sp_up_down[3].equals("▲")){

                        }
                    }catch (ArrayIndexOutOfBoundsException e){
                        Elements contents_up_down = document1.getElementsByClass("index-down");
                        up_down = contents_up_down.text();
                    }

					//뉴스
                    document2 = Jsoup.connect("https://finance.naver.com").get();
                    String str1 = "#content > div.article > div.section > div.news_area > div > ul > li:nth-child(";
                    String str2 = ") > span > a";
                    for (int i = 1; i <7; i++) {
                        String str3 = String.valueOf(i);
                        String final_str = str1+str3+str2;
                        Elements elements = document2.select(final_str);
                        String abs = elements.attr("abs:href");
                        Data data = new Data();
                        data.setStr_news(elements.text());
                        data.setNews_link(abs);
                        arrayList.add(data);
                    }
                    Collections.reverse(arrayList);


                    String[] sp_price = price.split(" ");
                    String[] sp_up_down = up_down.split(" ");
                    if(sp_up_down[3].equals("▲")){
                        kospi.setTextColor(Color.parseColor("#FF0000"));
                        kospi_updown1.setTextColor(Color.parseColor("#FF0000"));
                        kospi_updown2.setTextColor(Color.parseColor("#FF0000"));
                    }else if(sp_up_down[3].equals("▼")) {
                        kospi.setTextColor(Color.parseColor("##0027FF"));
                        kospi_updown1.setTextColor(Color.parseColor("##0027FF"));
                        kospi_updown2.setTextColor(Color.parseColor("##0027FF"));
                    }else{

                    }
                    if(sp_up_down[9].equals("▲")){
                        kosdaq.setTextColor(Color.parseColor("#FF0000"));
                        kosdaq_updown1.setTextColor(Color.parseColor("#FF0000"));
                        kosdaq_updown2.setTextColor(Color.parseColor("#FF0000"));
                    }else if(sp_up_down[9].equals("▼")) {
                        kosdaq.setTextColor(Color.parseColor("##0027FF"));
                        kosdaq_updown1.setTextColor(Color.parseColor("##0027FF"));
                        kosdaq_updown2.setTextColor(Color.parseColor("##0027FF"));
                    }else{

                    }


                    bundle.putString("kospi",sp_price[1]);
                    bundle.putString("kosdaq",sp_price[3]);
                    bundle.putString("kospi_u_d1",sp_up_down[4]);
                    bundle.putString("kospi_u_d2",sp_up_down[5]);
                    bundle.putString("kosdaq_u_d1",sp_up_down[10]);
                    bundle.putString("kosdaq_u_d2",sp_up_down[11]);


                    Message msg = handler.obtainMessage();
                    msg.setData(bundle);
                    handler.sendMessage(msg);
                }catch (IOException e){
                    e.printStackTrace();
                }
            }
        }.start();
        return view;
    }
    Handler handler = new Handler(){
        @Override
        public void handleMessage(@NonNull Message msg) {
            Bundle bundle = msg.getData();
            kospi.setText(bundle.getString("kospi"));
            kosdaq.setText(bundle.getString("kosdaq"));
            kospi_updown1.setText(bundle.getString("kospi_u_d1"));
            kospi_updown2.setText(bundle.getString("kospi_u_d2")+"%");
            kosdaq_updown1.setText(bundle.getString("kosdaq_u_d1"));
            kosdaq_updown2.setText(bundle.getString("kosdaq_u_d2")+"%");

            mainAdapter.notifyDataSetChanged();

        }
    };

}
다음 시간에는 인트로 화면과 실행 중임을 알리는 프로그래스바를 만들어 보겠습니다.
수고하셨습니다!
'안드로이드' 카테고리의 다른 글
| 안드로이드 DataBinding 사용 방법 (0) | 2022.09.16 |
|---|---|
| [안드로이드] #4 평단가계산기+크롤링 마무리 (주식, 코인 평단가 계산기 + 크롤링 + 바텀네비게이션뷰) (1) | 2022.09.01 |
| [안드로이드] #2 주식, 코인 평단가계산기 (주식, 코인 평단가 계산기 + 크롤링 + 바텀네비게이션뷰) (0) | 2022.08.26 |
| [안드로이드] #1 바텀네비게이션뷰 (주식, 코인 평단가 계산기 + 크롤링 + 바텀네비게이션뷰) (2) | 2022.08.24 |
| 안드로이드 생명주기 (LifeCycle) 정리 (JAVA) (0) | 2022.08.22 |


